
前言※
trilium 对 markdown 的支持不太友好,之前一直是使用<代码笔记>+marktext 组合的方式写博文,这样子虽然在写作上不成问题,但是在知识库中回顾整理的时候发现浏览体验比较差,毕竟写博客是一件自娱自乐的事情(笑),自己看的舒服最重要。
在加上前几天折腾了 trilium 的 css 样式,使得其编辑体验大幅提高,于是开始思考能否把 trilium 导出的文章一键转换成标准的 markdown 格式,于是有了本次折腾经历。
目的※
本次折腾旨在实现以下功能
- 博文自动生成 front-matter 信息
- 图片自动上传到图床,并且插入原文中
- 博文自动移入 hexo 本地库中
准备工作※
制作博文模板※
在制作脚本之前,我需要使文章具备统一的特征,以便程序能够准确无误地识别文章信息。通过 trilium 的模板功能,可以制作一个统一的模板。
新建一个文本笔记,在标签信息中加入如下属性:
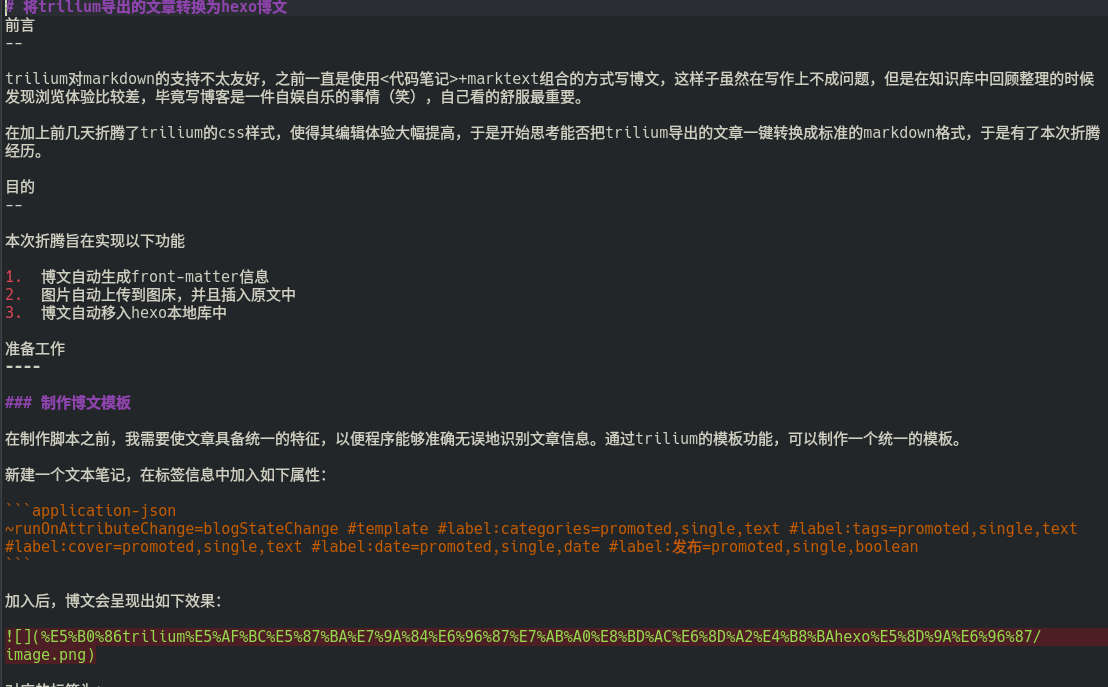
~runOnAttributeChange=blogStateChange #template #label:categories=promoted,single,text #label:tags=promoted,single,text #label:cover=promoted,single,text #label:date=promoted,single,date #label:发布=promoted,single,boolean 加入后,博文会呈现出如下效果:

对应的标签为:
categories – 分类
tags – 标签
cover – 文章主图
date – 写作时间
为了方便程序处理,每一项需要按照统一的格式书写,这里我自己定义了、作为分隔符,其他按照标准的数组形式。比如categories这项的内容可以写入:
["经验总结,技术分享"]、[生活随笔]
其中还有一个发布按钮,本来是打算点击后自动导出文章并且运行之后写的python脚本,但是我没有在api中找到导出笔记相关的接口,而且笔记中的js无法调取shell指令。于是只实现了把已发布的文章移动入归档文件夹的功能。通过绑定`~runOnAttributeChange=blogStateChange事件,在blogStateChange中写入如下脚本,当“发布”标签发生变化时执行。
if (api.originEntity.isDeleted) {
    return;
}

blogUnpublishedRoot = api.getNoteWithLabel("blogUnpublished")
blogPublishedRoot = api.getNoteWithLabel("blogPublished")

if(!blogUnpublishedRoot || !blogPublishedRoot) {
    return
}
const note = api.originEntity.getNote();
isPublished = note.getLabelValue("发布") == "true"

if (blogUnpublishedRoot.getChildNotes().includes(note)) {
    api.toggleNoteInParent(isPublished, note.noteId, blogPublishedRoot.noteId);
    api.toggleNoteInParent(!isPublished, note.noteId, blogUnpublishedRoot.noteId);
}else {
    api.toggleNoteInParent(!isPublished, note.noteId, blogUnpublishedRoot.noteId);
    api.toggleNoteInParent(isPublished, note.noteId, blogPublishedRoot.noteId);
}
博文模板制作完成,之后创建博文时,需要使用这个模板进行生成并且填好相应的标签。
观察导出的文件规律※
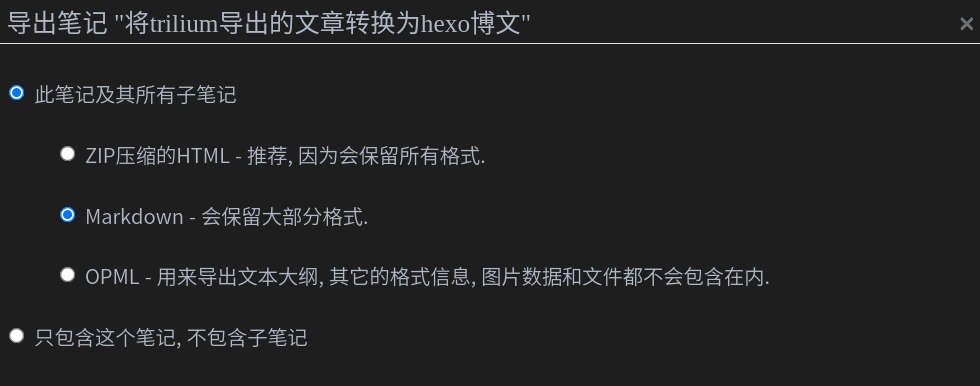
首先 trilium 的导出格式选择【此笔记及其所有子笔记】-【Markdown】。这种导出格式会将正文按照 markdown 格式进行格式化,但是还不能直接导入至 hexo 中,一是因为没有 front-matter 信息,二是因为图片信息使用的是相对路径,没有上传至图床,博客无法直接使用。
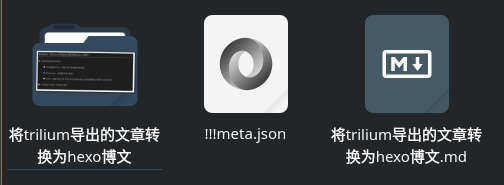
导出后是一个.zip包,解压后发现里面有三个文件,依次是本地图片文件夹、元数据信息、文章正文。
首先打开!!!meta.json文件,这是一个标准的 json 格式文件,截取了一些片段,格式大致如下:
{
	"formatVersion": 1,
	"appVersion": "0.57.3",
	"files": [
		{
			"isClone": false,
			"noteId": "sYiayejGUksl",
			"notePath": [
				"sYiayejGUksl"
			],
			"title": "将 trilium 导出的文章转换为 hexo 博文",
			"notePosition": 10,
			"prefix": null,
			"isExpanded": true,
			"type": "text",
			"mime": "text/html",
			"attributes": [
				{
					"type": "label",
					"name": "categories",是
					"value": "[\"经验总结\",\"技术分享\"]",
					"isInheritable": false,
					"position": 20
				},

				……
观察后发现格式有一定的规律,我们需要的是「attributes」下的内容,其中记录了我们在模板中定义的标签的值,这就是我们需要的 front-matter 信息。
以笔记名称命名的文件夹中保存了文章中的图片数据,trilium 是自带图片压缩功能,导出的图片也是经过压缩后的图片。
最后的 md 文件是文章的正文,打开后发现格式已经成为标准的 markdown 格式,但是缺少 front-matter 信息,而且图片是以相对路径插入,后文的目的就是对这个文件按照我们的需求进行格式化。

制作脚本※
解压文件※
统一一下文件的路径,这里我进行如下定义:
trilium_export_path = '/home/用户名/文档/trilium_export_blogs'
hexo_ports_path = '/home/用户名/文档/myfile/blog/source/_posts'trilium_export_path为 trilium 导出的文件夹,hexo_ports_path为 hexo 的博文文件夹。
由于导出的是 zip 文件,所以首先对 zip 进行解压操作:
files = os.listdir(trilium_export_path)
for file in files:
    if file.split('.')[-1] != "zip":
        break
    fileName = file.split(".")[0]
    filePath = os.path.join(trilium_export_path,file)
    readZip = zipfile.ZipFile(filePath)
    readZip.extractall(os.path.join(trilium_export_path,fileName))
    readZip.close()
os.remove(filePath)此时trilium_export_path中只剩下解压后的文件,我们重新遍历一次。
files = os.listdir(trilium_export_path)
for file in files:
    fileNameCode = urllib.parse.quote(file)
    filePath = os.path.join(trilium_export_path,file)
获取 json 内容※
在上文中我们发现一篇笔记下有三个文件,接下来先读取 json,获取 front-matter 信息并且格式化。
    jsonFile = os.path.join(filePath,"!!!meta.json")
    front_matter = "---"
    with open(jsonFile) as jf:
        data = json.load(jf)
        for attributes in data["files"][0]["attributes"]:
            if (attributes["type"]) == "label":
                if (attributes["name"]) == "categories":
                    categories = attributes["value"].split("、")
                    front_matter += "\n\n" +  attributes["name"] + ": "
                    for categorie in categories:
                        front_matter += "\n\n- " + str(categorie)
                else:
                    front_matter += "\n\n" +  attributes["name"] + ": " + attributes["value"]
通过以上代码获取了我们在博文模板中定义的标签值,并且按照一定格式进行了格式化,但一篇文章还需要标题和更新时间,这是没有在模板中定义的。可以加入以下代码自动获取文章标题和更新时间:
front_matter += "\n\n" + "title: " + file
front_matter += "\n\n" + "updated: " + datetime.datetime.now().strftime('%Y-%m-%d %H:%M:%S')
读取 md 内容※
md 是纯文本文件,可以直接读取,因为下文中需要将原文中的图片链接做替换,所以先将 md 内容缓存起来。
    mdFile = os.path.join(filePath,file+".md")
    content = ""
    with open(mdFile,"r") as mf:
        content = mf.readlines()
        mf.close()
    #将 front-matter 写入 content
    content.insert(0,front_matter)
content = "".join(content)上传图片至图床※
我已经配置好了 picgo-core 中的相应参数,此处直接调用 picgo 的指令即可。
    # 使用 picgo 上传文件夹的图片并且对 md 文件中的图片链接做替换
    imgPath = os.path.join(filePath,file)
    imgs = os.listdir(imgPath)
    for img in imgs:
        # picgo 上传并且获取返回的链接
        imgLink = os.popen("picgo u " + os.path.join(imgPath,img)).read().split("\n")[-2]
        content = content.replace(fileNameCode+'/'+img,imgLink)
将博文移到 hexo 中※
先将格式化完成的文本保存回 md 文件。
 with open(mdFile,"w") as mf:
        mf.write(content)
mf.close()使用shutil库中的copy方法将格式化后的文件移动到 hexo 中。
shutil.copy(mdFile,hexo_ports_path)至此主要功能已经实现,下文继续进行一些其他配置以方便使用。
将脚本配置为指令※
在头部文件中加入如下声明,这样 python 文件就可以省略为.py 的后缀,将文件命名为tohexo
#!/usr/bin/python赋予脚本可执行权限:
chmod a+x tohexo将脚本放入/usr/local/bin/文件夹下,这样脚本就可以全局执行。
使用※
经过如上配置后,整个发布流程变为如下:
- 导出文章
- 打开 cmd 输入
tohexo - 此时文件已经存到本地 hexo 中,如果需要发布到博客的话按照 hexo 的发布流程即可
tohexo 前:
tohexo 后:
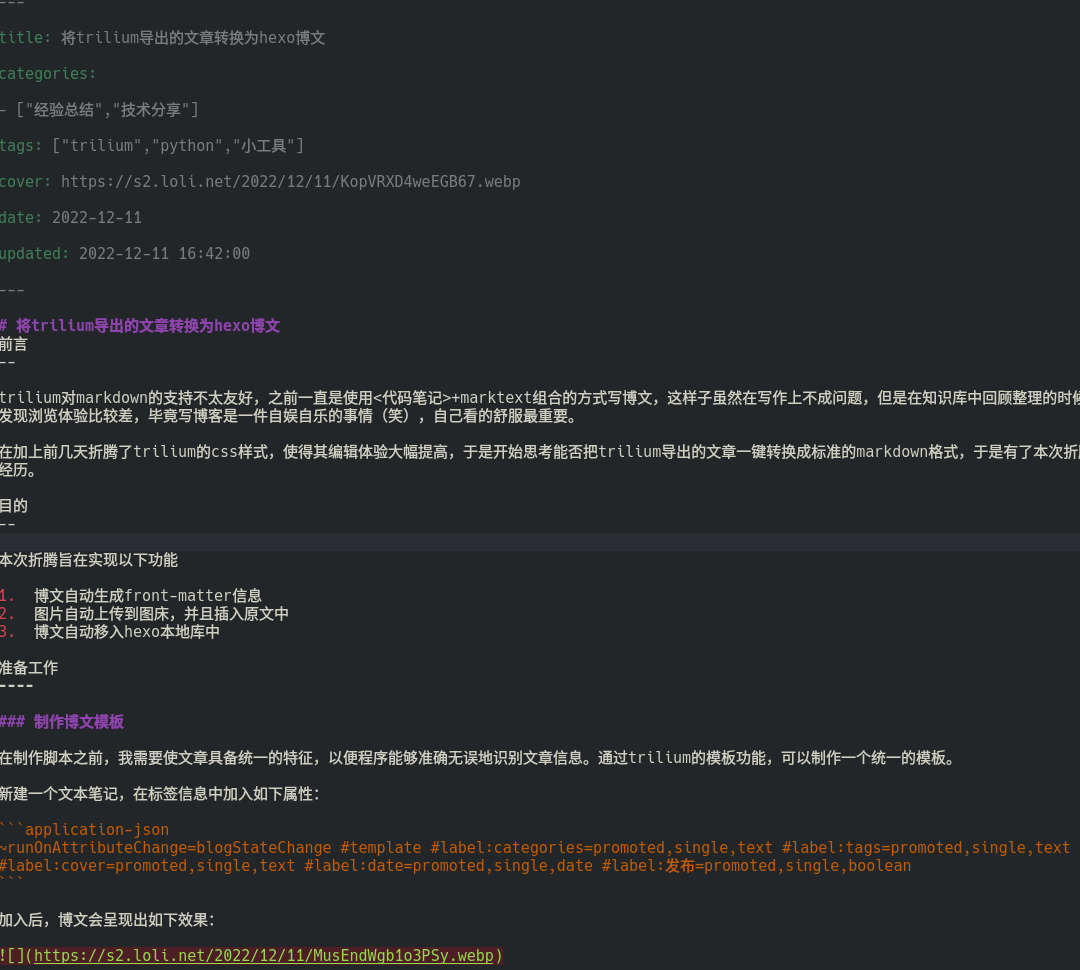
可以看到 tohexo 后文章多了 front-matter 信息,图片链接也由原来的相对路径替换为图床链接。
结语※
经过配置后发布体验较原来有了提高,我可以专注于写作上,无需操心图片压缩和 front-matter 的事情,这些重复的工作就交给程序完成。
但是目前还有一个小问题:如果文章有修改,图片会重新上传一次。不过按照我的发图频率来看 sm.ms 图床的容量应该是绰绰有余。